
Saturday, April 16, 2016

Distant Stitch Level 2 Machine Embroidery - Module Three - Chapter One - Flight of Fancy
Page 1. Sources
I started with Kites


 Page 2
And then went to butterflies ….. soon realizing these are not fanciful ….. although they are designs of the real thing.
Page 3
Then I went to Folk Art. I really like this collection of fish but soon found out it was hard to adjust to a design for sewing. I expect I could have used the tear drops some how.

Page 4
Now this fish had lots of potential!!!!!

Page 5
This folk art scene could provide lots of designs but I didn’t colour the picture. I like the drawings|!!!

Page 6
This folk art piece was the start of the first stitched fabric for backgrounds
 l
l
Page 7
The FIRST coloured piece below is done with Prisma pencils. I chose to use the True Blue and the Peacock Blue interspersed with Scarlet Lake for the darker tones. Then I used Chartreuse and Non-Photo Blue for intervals throughout the piece as mid tone colours. For the lighter tones in between everything, I used Deco Blue and Blush Pink. I left out the white. I didn’t like the final result.
For the SECOND drawing, I used water coloured crayons and pencils as listed above (I hope you can read the writing!) The blue peacock colour is much too bold and takes over the sample. The red and the pink came out well. There was not enough mid-tone and light tone blues. I was not able to get the variety of colours as with the pencil crayons.

Page 8
I chose to use the water colour pencils to create a design using the above folk art picture. I liked this one better.

Page 9
The first picture is the transfer painted paper with the printed piece of bridal satin below.


Page 10
The final stitched piece.
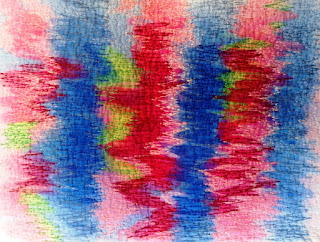
I used free motion zig-zagging for the whole piece with dropped feed dogs. I felt it worked better and covered the printing well. Used a piece of felt as a stabilizer. I layered the stitching as listed below.
1. very pale pink – 100% rayon embroidery thread
2. pale blue – 100% rayon embroidery thread
3. mid- pink – 100% rayon
4. shade of mid-blue - Aurifil 100% cotton – colour #4140
5. dark red - 100% rayon from Thread Studio – colour #1658
6. dark royal blue – 100% rayon
7. yellow green - WonderFil 100% rayon – 40 weight – colour #4152
Bobbin threads - used cottons and polyester threads to match the top thread.

These are the threads used in this project.
I liked the final effect of the stitching with the bits of coloured painting showing through.
Page 11. Second Stitched background
I chose the collar piece of the fish on page 4 above. Below is a free hand drawing with a possible idea of how to fill in the spaces.

This is reverse drawing which I traced onto a piece of tear away.

Page 12.
The resulting piece.

I used a piece of black felt with a stabilizer of tear away. This time with the free motion I put the length at 0. I reduced the pressure of the presser foot.
Cable stitched the major lines
1. straight curved lines – lime green pearl cotton #3 - top thread was lime green 100% rayon – Thread Studio
2. Triangles and half circles – violet pearl cotton #3 – top thread was Aurifil 100% polyester – variegated blue violet to red violet – colour #5870
3. Seed like structures between the yellow green lines – Treenway silk fine cord – variegated red violet - top thread – as for the Triangles and half circle outlines
Rest of the stitched pieces
1. centers of triangles and half circles – Aurifil #5870 – 100% polyester – variegated tints of blue violet and red violet
2. triangles in the spaces beside the seed like structures between the yellow green lines – variegated WonderFil 100% rayon – variegated greens – colour 8224
Fun piece to do!!!
Page 13 Automatic patterns
The first piece was done a piece of velvet with a stabilizer of white felt.

1. top left - Flower pattern (#22) - stitch length 6.0 – stitching with the nap gives a better result. Top thread – variegated 100% rayon – Carnivale from Thread Studio. Bobbin thread – Aurifil red violet for all patterns
2. bottom left - leaf pattern (#24) – stitch length 4.0 and width 5. Top thread – variegated yellow to yellow orange – 100% rayon – Thread studio – colour – Gold.
3.top right - tulip pattern (#20) – stitch length 3.0. Top thread – variegated tone on tone reds - 100% rayon – colour Ruby – Thread Studio. Alternating rows using mirror image.
4.bottom right – diamond pattern (#11) – stitch length 4.5 – Aurifil 100% cotton – same colour as base fabric – #2468. mirror image of each stitch row.
|I thought the effects were good.
Page 14. More automatic stitches


1. heavier material used for upholstery - flower pattern (#22) – top thread – Tubino – 100% cotton - yellow orange – colour #2554. bobbin thread – yellow.
2. natural wild silk fabric - leaf stitch pattern (24) – stitch length 4.0 - top thread 100% polyester – shiny light brown.
Page 15. Sheers – strips.

I laid the torn strips of organzas on top of the white felt and used a heat gun. Several of the pieces were melted together. I added some more bits and pieces to intensify the colours. Created a great effect but I had forgotten to add the fusible webbing. So I stitched them down using invisible thread.


The piece at the top was the first layer of organza strips. I added a few more strips and used the heat gun to attach them. Really looks totally different with considerably more distortion.
Both pieces were squared off with the soldering iron …. although the second one is a bit lop-sided and one side was not touched!!! I really like the final colours of the two pieces.
Page 16. Sheers – snippets


Red piece of organza at the top and pale green below. The gold bits really show up in the photograph for both sides. I have done a lot of work using this technique. I have Margaret Beal’s books. I finished off the edges with her special soldering iron.
Page 17. Black Snippets.

Fabrics used. Velvet (really shows up), shiny bridal satin, polyester lining, cotton twill, mesh, screening, gauze all stitched onto black felt as a stabilizer.
Page 18. Angelina

Used pink and silver Angelina onto black felt.
Page 19. Painted fusible webbing.


On the left is a small left over piece of the white felt that had been spray painted using stencils (created in a workshop with Dale Rollerson ). I pained a piece of fusible web in a colour to match. When I ironed the web onto the felt, not all of the fusible came off. I liked the result and so did not proceed to do another one. Thread - WonderFil – 100% rayon in a shade of red violet. Stitch length - 4.0 .
Page 20. Printed and stitched background.


The Folk Art fish on page 4 was used for these two stamps. The one on the left was the motif in the center of the picture and the right motif was the end of the fin.
Page 20.

I chose a piece of snow died 100% cotton fabric that I had made when we had a couple of hours of snow still on the ground early this year. The piece was stamped in a the pattern above. I had trouble with the paints. I tried several of my paints and none of them worked very well so I must admit that I painted over with a paint brush and it shows!! I thought that my opaque fabric paints would work but they didn’t and neither did the acrylic paints. I will keep trying. Maybe my fabric was too porous!!!
I stitched a pattern around the stampings using Aurifil 100% cotton with magenta shade #2455 for the top thread and a darker shade of magenta #246 in the bobbin.
YEH …. this chapter is finally finished. I think!!!
I started with Kites


 Page 2
And then went to butterflies ….. soon realizing these are not fanciful ….. although they are designs of the real thing.
Page 3
Then I went to Folk Art. I really like this collection of fish but soon found out it was hard to adjust to a design for sewing. I expect I could have used the tear drops some how.

Page 4
Now this fish had lots of potential!!!!!


Page 5
This folk art scene could provide lots of designs but I didn’t colour the picture. I like the drawings|!!!


Page 6
This folk art piece was the start of the first stitched fabric for backgrounds


Page 7
The FIRST coloured piece below is done with Prisma pencils. I chose to use the True Blue and the Peacock Blue interspersed with Scarlet Lake for the darker tones. Then I used Chartreuse and Non-Photo Blue for intervals throughout the piece as mid tone colours. For the lighter tones in between everything, I used Deco Blue and Blush Pink. I left out the white. I didn’t like the final result.
For the SECOND drawing, I used water coloured crayons and pencils as listed above (I hope you can read the writing!) The blue peacock colour is much too bold and takes over the sample. The red and the pink came out well. There was not enough mid-tone and light tone blues. I was not able to get the variety of colours as with the pencil crayons.


Page 8
I chose to use the water colour pencils to create a design using the above folk art picture. I liked this one better.


Page 9
The first picture is the transfer painted paper with the printed piece of bridal satin below.


Page 10
The final stitched piece.


I used free motion zig-zagging for the whole piece with dropped feed dogs. I felt it worked better and covered the printing well. Used a piece of felt as a stabilizer. I layered the stitching as listed below.
1. very pale pink – 100% rayon embroidery thread
2. pale blue – 100% rayon embroidery thread
3. mid- pink – 100% rayon
4. shade of mid-blue - Aurifil 100% cotton – colour #4140
5. dark red - 100% rayon from Thread Studio – colour #1658
6. dark royal blue – 100% rayon
7. yellow green - WonderFil 100% rayon – 40 weight – colour #4152
Bobbin threads - used cottons and polyester threads to match the top thread.


These are the threads used in this project.
I liked the final effect of the stitching with the bits of coloured painting showing through.
Page 11. Second Stitched background
I chose the collar piece of the fish on page 4 above. Below is a free hand drawing with a possible idea of how to fill in the spaces.


This is reverse drawing which I traced onto a piece of tear away.


Page 12.
The resulting piece.


I used a piece of black felt with a stabilizer of tear away. This time with the free motion I put the length at 0. I reduced the pressure of the presser foot.
Cable stitched the major lines
1. straight curved lines – lime green pearl cotton #3 - top thread was lime green 100% rayon – Thread Studio
2. Triangles and half circles – violet pearl cotton #3 – top thread was Aurifil 100% polyester – variegated blue violet to red violet – colour #5870
3. Seed like structures between the yellow green lines – Treenway silk fine cord – variegated red violet - top thread – as for the Triangles and half circle outlines
Rest of the stitched pieces
1. centers of triangles and half circles – Aurifil #5870 – 100% polyester – variegated tints of blue violet and red violet
2. triangles in the spaces beside the seed like structures between the yellow green lines – variegated WonderFil 100% rayon – variegated greens – colour 8224
Fun piece to do!!!
Page 13 Automatic patterns
The first piece was done a piece of velvet with a stabilizer of white felt.


1. top left - Flower pattern (#22) - stitch length 6.0 – stitching with the nap gives a better result. Top thread – variegated 100% rayon – Carnivale from Thread Studio. Bobbin thread – Aurifil red violet for all patterns
2. bottom left - leaf pattern (#24) – stitch length 4.0 and width 5. Top thread – variegated yellow to yellow orange – 100% rayon – Thread studio – colour – Gold.
3.top right - tulip pattern (#20) – stitch length 3.0. Top thread – variegated tone on tone reds - 100% rayon – colour Ruby – Thread Studio. Alternating rows using mirror image.
4.bottom right – diamond pattern (#11) – stitch length 4.5 – Aurifil 100% cotton – same colour as base fabric – #2468. mirror image of each stitch row.
|I thought the effects were good.
Page 14. More automatic stitches


1. heavier material used for upholstery - flower pattern (#22) – top thread – Tubino – 100% cotton - yellow orange – colour #2554. bobbin thread – yellow.
2. natural wild silk fabric - leaf stitch pattern (24) – stitch length 4.0 - top thread 100% polyester – shiny light brown.
Page 15. Sheers – strips.


I laid the torn strips of organzas on top of the white felt and used a heat gun. Several of the pieces were melted together. I added some more bits and pieces to intensify the colours. Created a great effect but I had forgotten to add the fusible webbing. So I stitched them down using invisible thread.


The piece at the top was the first layer of organza strips. I added a few more strips and used the heat gun to attach them. Really looks totally different with considerably more distortion.
Both pieces were squared off with the soldering iron …. although the second one is a bit lop-sided and one side was not touched!!! I really like the final colours of the two pieces.
Page 16. Sheers – snippets


Red piece of organza at the top and pale green below. The gold bits really show up in the photograph for both sides. I have done a lot of work using this technique. I have Margaret Beal’s books. I finished off the edges with her special soldering iron.
Page 17. Black Snippets.


Fabrics used. Velvet (really shows up), shiny bridal satin, polyester lining, cotton twill, mesh, screening, gauze all stitched onto black felt as a stabilizer.
Page 18. Angelina


Used pink and silver Angelina onto black felt.
Page 19. Painted fusible webbing.


On the left is a small left over piece of the white felt that had been spray painted using stencils (created in a workshop with Dale Rollerson ). I pained a piece of fusible web in a colour to match. When I ironed the web onto the felt, not all of the fusible came off. I liked the result and so did not proceed to do another one. Thread - WonderFil – 100% rayon in a shade of red violet. Stitch length - 4.0 .
Page 20. Printed and stitched background.


The Folk Art fish on page 4 was used for these two stamps. The one on the left was the motif in the center of the picture and the right motif was the end of the fin.
Page 20.


I chose a piece of snow died 100% cotton fabric that I had made when we had a couple of hours of snow still on the ground early this year. The piece was stamped in a the pattern above. I had trouble with the paints. I tried several of my paints and none of them worked very well so I must admit that I painted over with a paint brush and it shows!! I thought that my opaque fabric paints would work but they didn’t and neither did the acrylic paints. I will keep trying. Maybe my fabric was too porous!!!
I stitched a pattern around the stampings using Aurifil 100% cotton with magenta shade #2455 for the top thread and a darker shade of magenta #246 in the bobbin.
YEH …. this chapter is finally finished. I think!!!
Wednesday, June 3, 2015
Module 2 Chapter 10 Manipulated Structures
Page 1
Decisions, decisions!! First of all I decided that I was going to use wire mesh!!! I started with flowers. I chose to use this yellow flower from Chapter 2 page 3. There were several petals and I could have three pieces of metal to be joined in the middle to be at the top with 6 petals that I could manipulate. I also decided to hang some stamens from the center.


My simple quick drawings of the petals, stamen and leaves. I decided to round out the bottom of the petals and each of the leaf projections.
Page 2
I chose the leaf pattern from Chapter 1 page 4. I would stich a heavy center with many rows and then outline each leaf section with one row of stitching and cut in between each leaf so that I could manipulate each lobe.

These are the models that I used for the petals and the leaves.


I used three shapes for the petals. The square bottom is the centre of the petal. I created 2 different sized leaves.
Page 3
Seed Pods - I chose this seed head with individual sections. I decided to made beads and hang them in a cluster.


Next question was how was I going to put these things altogether. I decided to thread a piece of wire through the centre of the 3 petal pieces. The 4 stamens (also of wire) will be looped over the this wire. The stem will also be a rolled up and twisted piece, using a piece of expandable wire mesh between 2 pieces of organza. The wires coming through the top of the petals will be interwoven into the wire mesh.The leaves and the seed pods will also be attached to this stem!!! Hopefully this will be a bit clearer as I progress through the project.

The paper mock up.
Page 4
My colour scheme. I have torched three pieces of copper with my heat tool.
Flower petals


For the petals, I backed the piece of woven wire cloth with an iron on soluble paper. (I removed the paper after I finished the stitching). I traced around my pattern with a violet Sharpie pen. First of all I outlined the petals with a cable stitch using variegated Treenway fine silk cord – colours vary from red to red violet. For the top thread, Signature Trilobal polyester variegated thread - colour – Primaries. For the rest of the piece I then used this Signature thread in the bobbin and for the top thread. A free motioned wavy pattern was used throughout the petals. I like the way the colours of the mesh and the threads blend together.
Page 5 Seed pods


For the seed pods, I backed the piece of copper woven wire cloth with a piece of violet organza using Wonder Under. I divided the piece into three sections and then marked 2 of the sections off into triangles. As you can see the one on the right is a variety of shapes and sizes and the one in the middle has 6 similar shapes. I decided at this point that I did not need another 6 seed pods. This time I used another variegated thread top and bottom …. Aurifil – Aurilex NE 36/2 – 100% polyester – colour 5868 – variegated violet, shocking pink to pale aqua. For continuity, free motion stitching in a wavy pattern. All edges were stitched.
For each seed piece, I made a bead by wrapping the triangular piece of wire mesh around a small crochet hook. It worked well! The beads were threaded on to a piece of orange copper wire and manipulated into a bunch!!! I created a hole in the top of a bead with a large needle.
Page 6
The 2 leaves.

A piece of burnished copper (not woven) was encased in a piece of green mottled organza. In the picture above the wire mesh is sitting on top of the fabric. I should have taken another picture of the completed leaves before they were incorporated into the final product. I placed paper cutouts of the leaves (above) on the fabric and mesh and stitched around the outside. Then I stitched several rows up through the centre. Each side of the leaf was stitched with many finger like projections from the outside to the centre allowing a reasonable space between each finger so cutting between them would not be too much of a problem. The mottled look of the burnished copper did show through to some extent. The thread used was from Thread Studio – 100% rayon – colour – Ironbark - variegated dark green to medium green to light grey green. It blended in well. The leaves were cut out and I manipulated the finger like projections into a happy arrangement!!!
Page 7 The stem

This time I used expandable steel mesh with a bronze coloured organza on both sides. More wavy free motion stitching using another variegated thread from Thread Studio – 100% rayon – colour – Stonehaven - from dark grey to medium grey to pale grey. The thread seemed to compliment the steel mesh and bronze organza. At one point I thought I might use the wires sticking out the top to join the stem to the flowers. In the end I used the copper wire. I only used half of the piece above for the stem (ie. the width was cut in half!!). The copper wires from the top of the petals were woven into the stem and then I rolled the stem up into a compact piece and then twisted the whole lot. The leaves were hand stitched onto the stem. The two ends of the wire holding the seed pods were threaded through the stem and tied together.
Page 8 The stamens and the threads.

The threads that I used for the project. I believe that they blended in well with the fabrics and the wire mesh that I used.
The ends of two lengths of copper coloured craft wire were wrapped around a small crochet needle and attached to the copper wire holding the three petals together. The individual petals were wrapped around a pencil and then pulled slightly so that they would still maintain a twisted product.
Page 9
The finished piece!!!!!

I feel that I have been quite successful. Each section has come out the way I had imagined. The colour of the flowers and the seed pods work well together with the seed pods somewhat subdued. Using a not so bright thread worked as did the organza backing. Unity was also attained with the wavy stitching throughout all the elements. The stem is sufficiently in the background and really serves the purpose of joining all the elements together. Use of the copper wire in several places is also successful. Maybe I should readjust the piece by bringing the leaves and seed pods down a long side the flower.
Actually, I am very happy with the piece.
Subscribe to:
Posts (Atom)